
You flush the toilet, walk away, and hear it start hissing again. In a quiet Macomb County bathroom, that sound is easy to ignore, but it usually means water is escaping through the tank or the fill valve isn't shutting off correctly. The good news is that a toilet fill valve or flapper replacement is often manageable, provided you diagnose the actual problem before buying parts.
The right approach isn't to install a complete rebuild kit automatically. Check the leak path, confirm the toilet's part compatibility, install the component carefully, and test the water level before calling the job finished. This guide explains how to replace a toilet fill valve and flapper for homeowners, landlords, property managers, and small businesses across Macomb County, Oakland County, and Wayne County, including Fraser, Sterling Heights, Clinton Township, Troy, Macomb, and Shelby Township.
Table of Contents
- Diagnosing a Running Toilet Before You Buy Parts
- Gathering the Right Tools and Compatible Parts
- Removing and Installing the New Toilet Flapper
- Swapping Out the Toilet Fill Valve and Adjusting the Float
- Testing Your Repair and Troubleshooting Common Issues
- When to Call a Professional Plumber in Southeast Michigan
Diagnosing a Running Toilet Before You Buy Parts
A running toilet can have several causes. The flapper may be leaking, the chain may be holding it open, the float may be set too high, or mineral debris may be preventing the flush valve seat from sealing. A noisy tank doesn't automatically mean both parts need replacement.
Start by removing the tank lid and observing the water. If the level rises to the overflow tube, the fill valve or float adjustment is the first suspect. A properly adjusted tank normally stops filling below the top of the overflow tube, rather than using the overflow tube as the normal shutoff route. The tank water level is typically set about 1/2 to 1 inch below the top of the overflow tube, according to toilet float adjustment guidance.
Use a simple decision tree
Try these checks before visiting the hardware store:
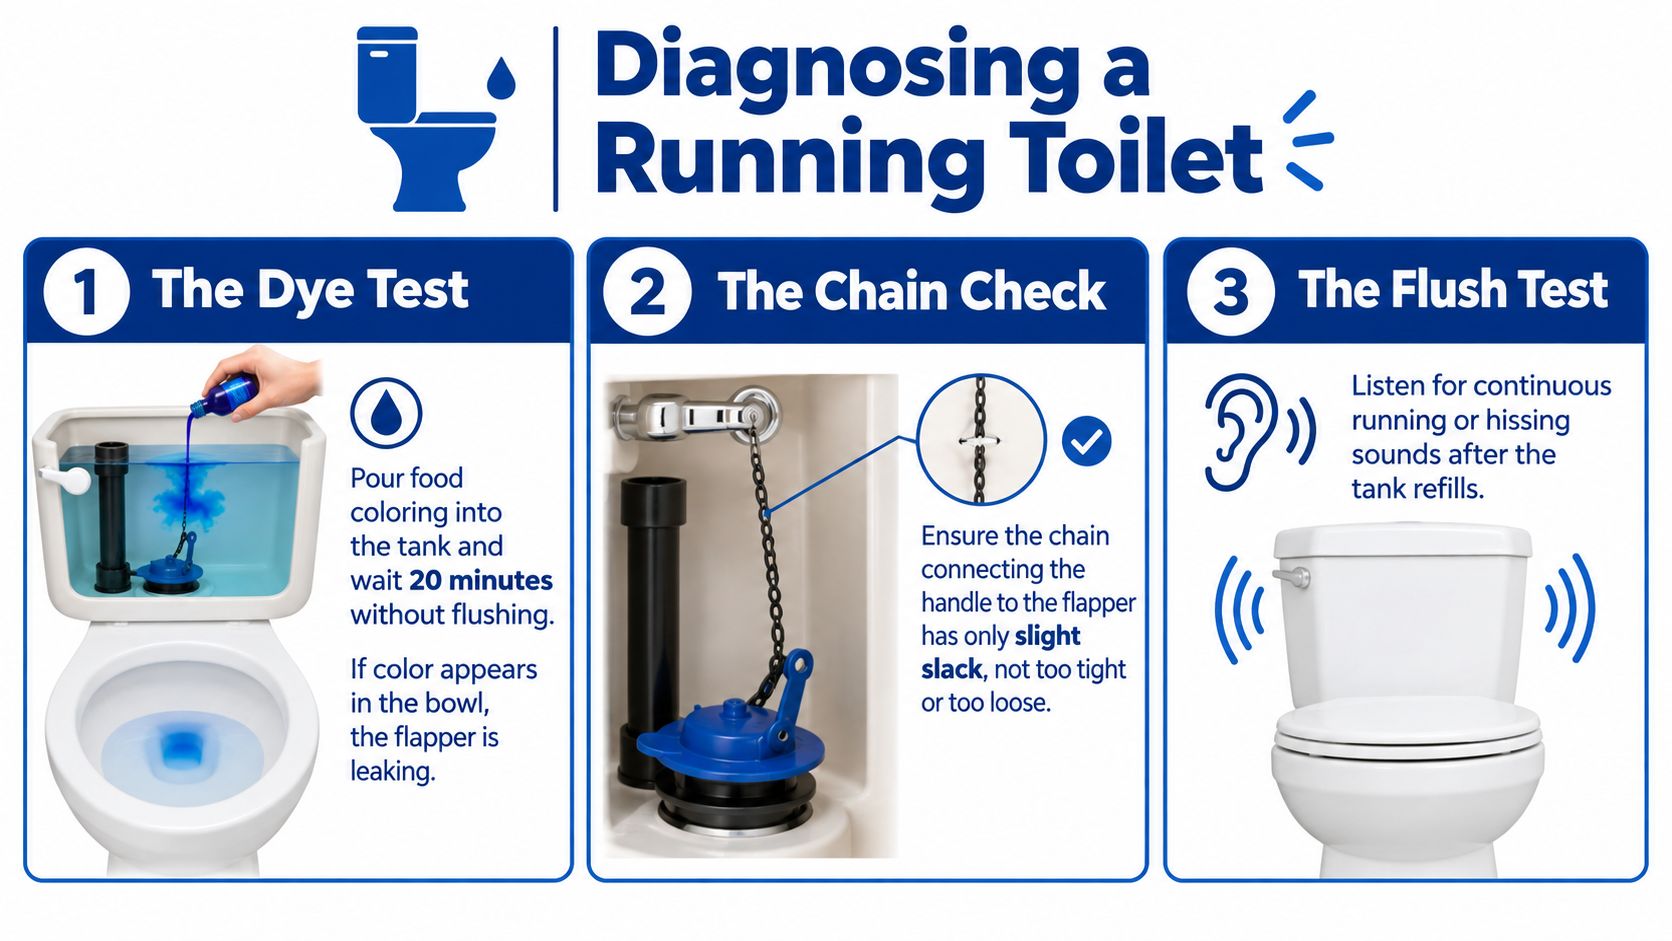
- Check for a flapper leak. Put food coloring in the tank without flushing and wait 20 minutes. If colored water reaches the bowl, the flapper isn't sealing.
- Inspect the chain. It should have slight slack when the handle is at rest. A chain that's too tight can hold the flapper open, while excessive slack can interfere with a complete flush.
- Listen after the refill cycle. Continuous hissing, cycling, or water entering the overflow tube points toward the fill valve, float setting, or refill-tube arrangement.
- Look at the flush seat. Dirt or mineral buildup can keep an otherwise usable flapper from sitting flat.
EPA WaterSense guidance recommends checking toilet flappers periodically and replacing them at least every five years because rubber wears out and the seal degrades, as explained in the EPA leak detection and repair guidance. Homes and rental properties in Southeast Michigan also deal with mineral deposits and changing seasonal conditions, so periodic inspection is sensible bathroom plumbing maintenance.
If the toilet flushes on its own, use this guide to a toilet that flushes on its own before replacing parts. If the diagnosis is uncertain, replacing the wrong component can leave the toilet running and create another service call.
Gathering the Right Tools and Compatible Parts
The repair goes more smoothly when the replacement parts match the toilet. “Universal” doesn't mean every flapper fits every flush valve. Toilets vary by flapper size, mounting style, overflow-tube shape, and water-level requirements.
Before purchasing anything, remove the tank lid and record the manufacturer and model number. The number may be molded into the porcelain or printed inside the tank. Measure the old flapper and confirm whether the toilet uses a 2-inch or 3-inch flapper. Also inspect where the refill tube connects and how it is clipped to the overflow tube.
Put the basic supplies within reach
You'll usually want:
- Adjustable wrench: For the supply connection and fill-valve locknut.
- Sponge: To remove water left in the tank.
- Small bucket: To catch water below the tank connection.
- Replacement flapper: Match its size and mounting style to the old part.
- Replacement fill valve: Choose an adjustable model that fits the tank and supply connection.
- Cleaning pad: Useful for removing buildup from the flush-valve seat.
- Towel: Protects the floor and makes small leaks easier to spot.
Most independent how-to sources recommend checking the tank manufacturer and model number, measuring the old flapper, and verifying the refill-tube position before buying parts, as outlined in this replacement flapper compatibility guide.
A high-quality adjustable fill valve can be practical when water pressure varies between homes or buildings in Fraser, Sterling Heights, and Clinton Township. The important point is fit and adjustment, not just choosing the most expensive package. If the toilet is older, take a photo of the tank interior and bring the old component with you when possible.
Removing and Installing the New Toilet Flapper
Turn the stop valve clockwise until it closes. Flush the toilet, then hold the handle down to drain as much water as possible. Use a sponge to remove the remaining water so the tank bottom is easier to work in and the chain and flapper are visible.
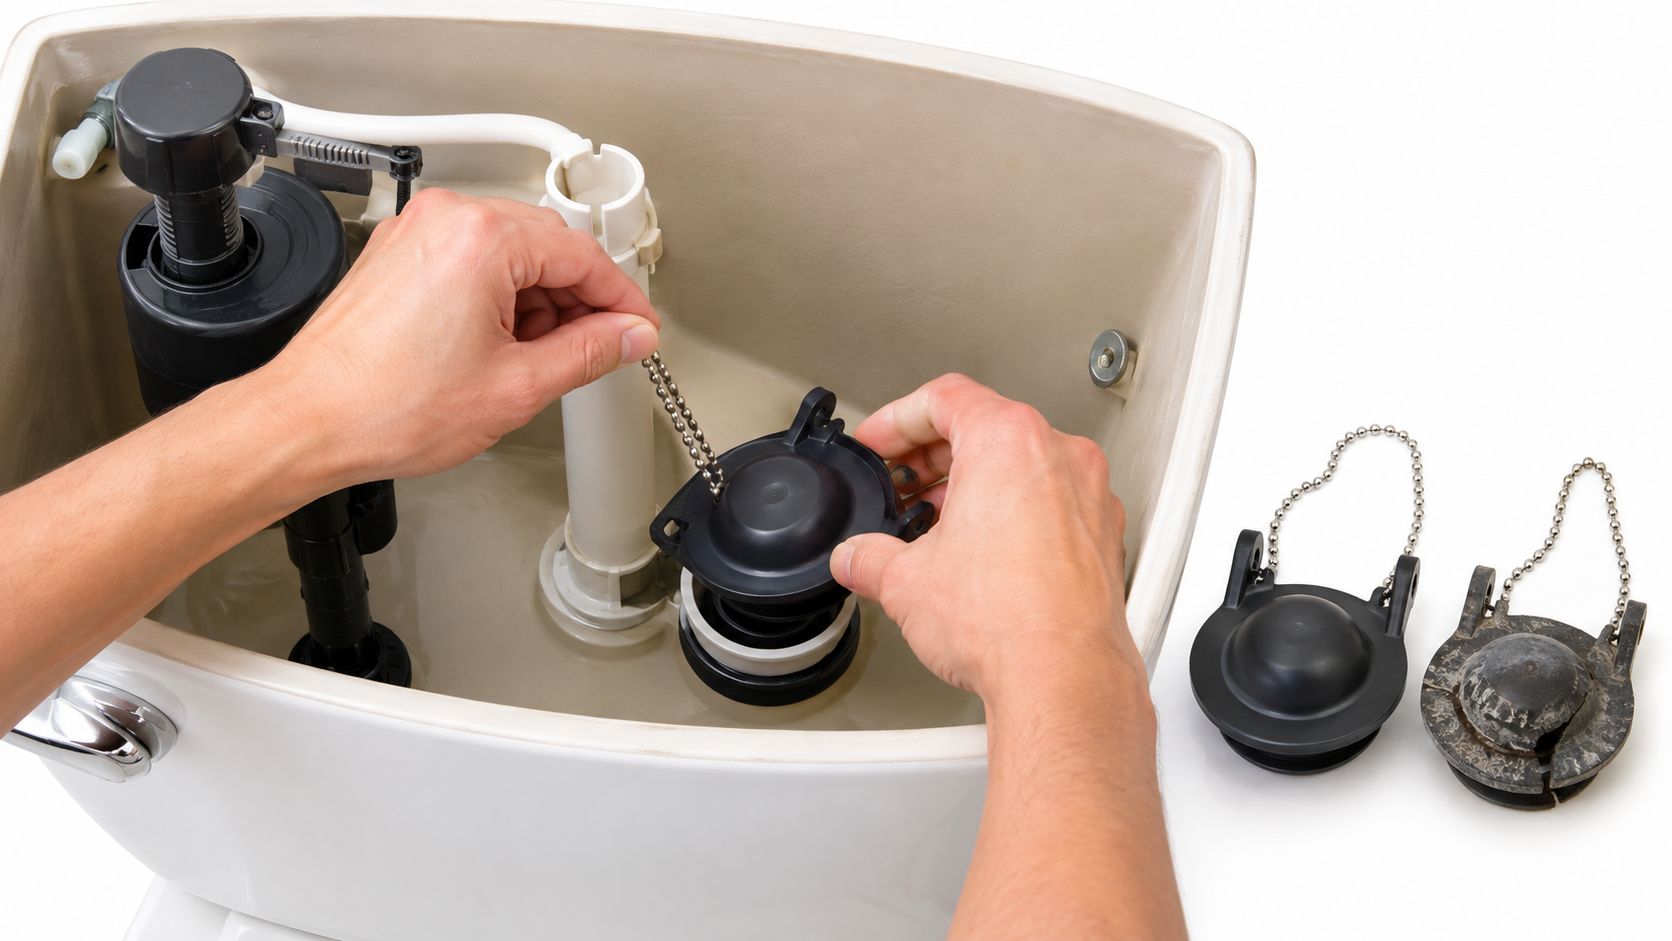
Disconnect the lift chain from the handle arm. Then unhook the old flapper from the ears on the overflow tube. Work gently around the plastic ears. Older plastic can become brittle, and forcing the hinge can damage the flush-valve assembly.
Clean before installing
Wipe the flush-valve seat with a sponge or suitable cleaning pad. Remove slime, mineral deposits, and loose debris, but don't gouge or damage the sealing surface. A new flapper can't compensate for a dirty or damaged seat.
Position the replacement flapper over the flush opening and attach it to the overflow-tube ears. Reconnect the chain to the handle arm, then check the adjustment with the flapper seated and the handle released.
The chain should have about 1/2 inch of slack, or roughly one to two links, as described in this flapper replacement guide. Shorten the chain if it holds the flapper open. If it hangs too loosely, move the hook closer to the flapper so the handle lifts it fully without allowing the chain to snag.
Use this video as a visual reference for the general removal and installation sequence:
Turn the water on slowly and watch the flapper settle. A good seal should stop the bowl from receiving a steady trickle once the tank refills.
Swapping Out the Toilet Fill Valve and Adjusting the Float
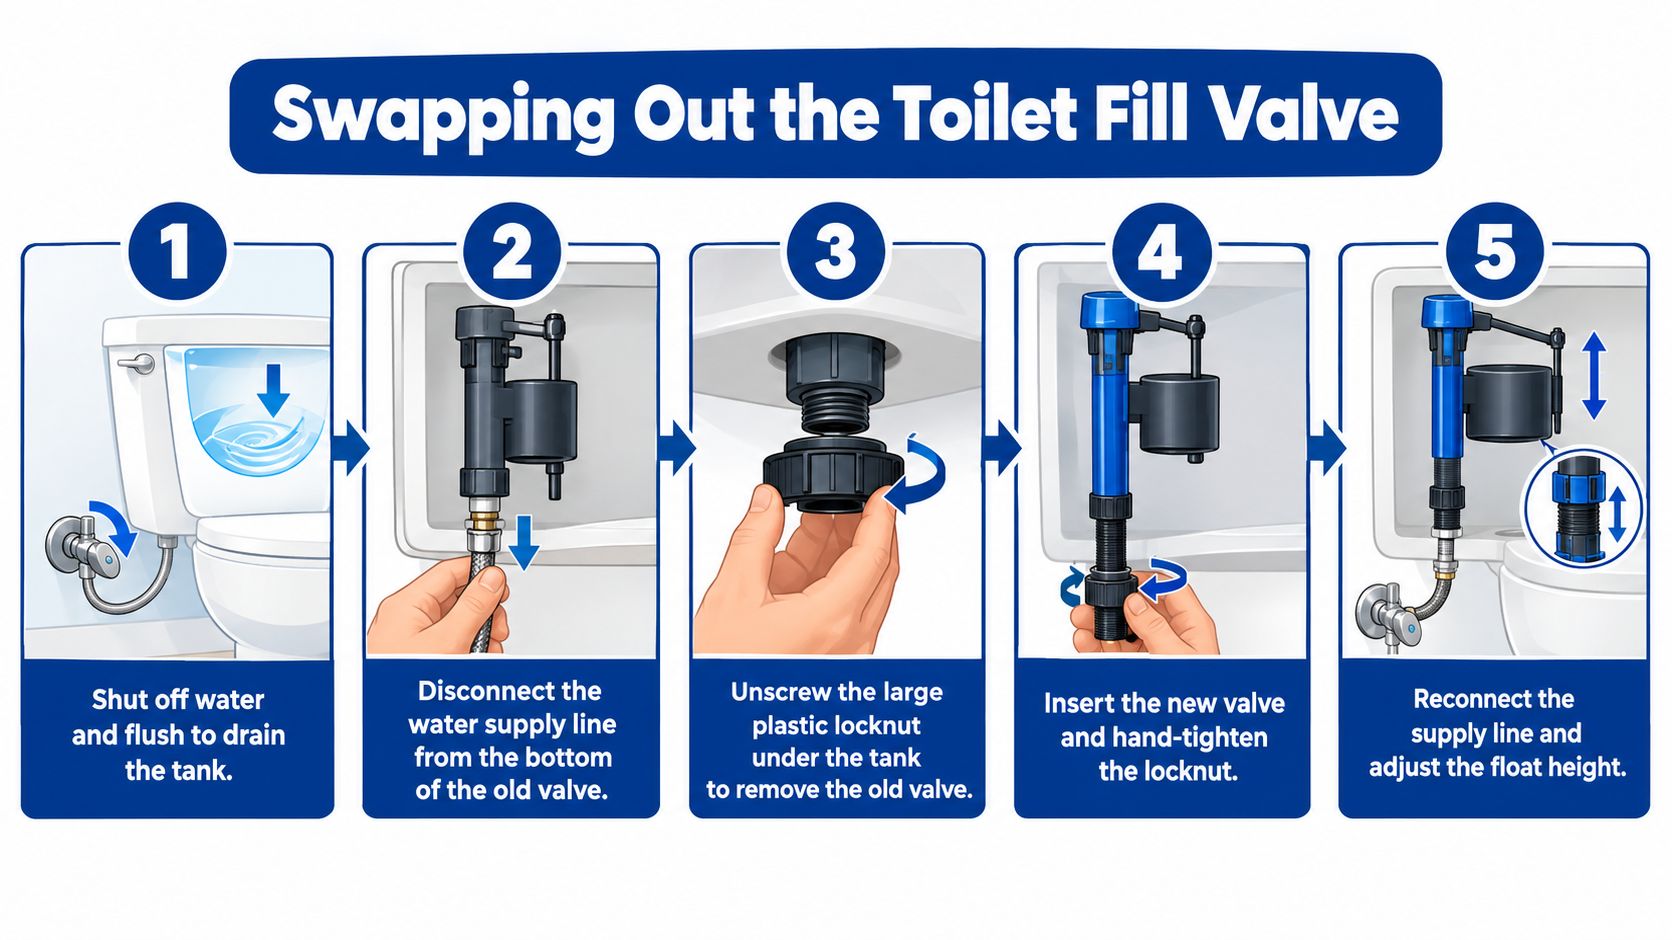
If the fill valve continues hissing after the flapper seals, or if water keeps entering the overflow tube, replace or adjust the fill valve. Shut off the stop valve first, flush the toilet, and sponge out the tank. Place a bucket under the tank because water will remain in the supply line and valve connection.
Disconnect the supply line from the bottom of the old valve. Loosen the locknut beneath the tank, remove the old valve, and clean the area around the tank opening. Set the new valve in place with its seal positioned correctly, then hand-tighten the locknut before using a wrench for a modest final tightening. Over-tightening can damage porcelain or distort the seal.
Set the valve and refill tube correctly
Adjust the new valve to the tank height rather than leaving it at its packaged setting. The critical-level mark should sit at least 1 inch above the top of the overflow tube, and the refill tube should discharge into the overflow tube during refill, according to this fill-valve installation guide.
Clip the refill tube in place. Don't route it over the tank rim or allow it to sit below the water line, because that can create improper refill behavior. Reconnect the supply line, open the stop valve gradually, and watch the first complete fill cycle.
Adjust the float until the water stops below the overflow tube. The valve should shut off cleanly without repeated cycling. If the toilet tank overflows or the water keeps rising, review this toilet tank overflow information before continuing to adjust the mechanism.
A fill valve that fits the opening but cannot be adjusted to the tank's height isn't a successful installation. Replace it with a compatible model rather than forcing the tank to operate outside its intended water level.
Testing Your Repair and Troubleshooting Common Issues
Don't put the tank lid back immediately. First, run several flushes and watch every connection. Look beneath the tank, around the supply line, and at the base of the toilet. Dry surfaces make small leaks easier to identify.
Observe the refill cycle from beginning to end. The valve should fill the tank, deliver water through the refill tube into the overflow tube, and then stop. Once it stops, listen for hissing and check the bowl for a continuing trickle.
Match the symptom to the adjustment
| What you notice | What to check first |
|---|---|
| Hissing after the tank fills | Float height, valve adjustment, and water entering the overflow tube |
| Bowl continues to trickle | Flapper seal, flush-valve seat, and chain slack |
| Weak or incomplete flush | Chain connection, flapper lift, and correct flapper fit |
| Water around the tank base | Supply connection, tank bolts, and tank seal |
| Tank fills slowly | Supply valve, inlet screen, and household water pressure |
A toilet that still runs after a correctly fitted flapper and adjusted fill valve may have a damaged flush-valve seat, cracked overflow tube, or another fixture leak. Don't keep swapping parts when the leak path hasn't changed. A professional can use leak detection techniques to separate a fixture problem from a larger water-pressure or piping issue.
Practical rule: A successful repair ends when the toilet fills, shuts off, flushes strongly, and stays dry. Installing the parts is only part of the job.
If a toilet backs up, drains slowly, or affects several fixtures, the problem may involve the building drain or sewer line rather than the tank. That calls for appropriate drain cleaning, camera inspection, or sewer repair instead of another flapper.
When to Call a Professional Plumber in Southeast Michigan
A fill valve and flapper are reasonable DIY repairs when the toilet is stable, the tank components are accessible, and the issue is clearly isolated. Call a licensed plumber if the toilet rocks, water pools around the base, the porcelain is cracked, or the repair exposes damaged supply connections, tank bolts, or older cast-iron plumbing.
Property managers in Troy, Macomb, and Shelby Township also need to consider repeat failures across multiple units. A technician can check whether several running toilets share a water-pressure problem, aging fixtures, hidden leaks, or installation issues. Commercial plumbing systems in offices, restaurants, and rental buildings deserve the same diagnostic approach as residential plumbing, but the consequences of repeated water loss and downtime can be harder to manage.
A constantly running fill valve can waste between 0.5 and 3 gallons per minute, and EPA materials say that may add up to 4,000 gallons of water per day, according to this EPA WaterSense restroom guidance. A persistent run is worth addressing promptly, without assuming that a full toilet replacement is necessary.
For urgent leaks, overflowing fixtures, frozen pipes during Michigan winters, basement flooding after heavy rain, or a toilet problem that affects other drains, use 24/7 emergency plumbing service. A plumber can also help with residential plumbing, commercial plumbing, water heater repair, water heater replacement, pipe repair, leak detection, garbage disposal repair, sump pump repair, bathroom plumbing, kitchen plumbing, and sewer work when the problem extends beyond the tank.
Call Jays Plumbing and Sewer at 586-634-3450 for toilet fill-valve and flapper diagnosis, repair, or replacement across Macomb County, Oakland County, and nearby Southeast Michigan communities. For scheduled service or an urgent plumbing problem, visit Jays Plumbing and Sewer to request help with the repair and get practical advice before a small leak becomes a larger plumbing concern.
